just ram

stuff I should remember

npm install - visual studio build tools problem

Trying to install a node module on windows (via npm) and I keep getting the annoying error message:

1
error MSB8020: The build tools for Visual Studio 2010 (Platform Toolset = 'v100') cannot be found. To build using the v100 build tools, p lease install Visual Studio 2010 build tools.

I have Visual Studio 2013 installed but the project requires the 2010 version. After lots of digging around I discovered an option you can pass to npm, forcing it to use whatever version of Visual Studio you like.

npm install karma --msvs_version=2013

This was a welcome relief as getting the Visual Studio 2010 build tools appears to involve a full install of Visual Studio 2010!?!

Vim to Emacs - Smart Tab

This post is part of a series:

  1. Vim to Emacs
  2. Vim to Emacs - Ace Jump Mode
  3. Vim to Emacs - YASnippets
  4. Vim to Emacs - Smart Tab

The latest thing I’m missing from Vim is tab completion. I’d like to hit tab and have Emacs either insert a snippet or try to auto-complete the word based on what I just typed.

With lots of Googlizing I’ve managed to hack together a solution, it’s not perfect (yet) but still meets most of my needs for now.

Setup

Download smart-tab.el from genehack (or from me) and save it in to the .emacs.d/vendor folder.

Next create a tab.el in the .emacs/personal folder.

personal/tab.el

1
2
3
4
5
6
7
(require 'smart-tab)
(require 'yasnippet)

(cons 'yas/hippie-try-expand 'hippie-expand-try-functions-list)

(setq smart-tab-using-hippie-expand t)
(global-smart-tab-mode t)

Here I am using cons to push YASnippets to the front of the hippie expand list, this means snippets are found before trying to auto-complete words.

As I said this is not perfect, I can’t auto-complete in the middle of a snippet process for instance but it’s not a bad start.

Vim to Emas - YASnippet

This post is part of a series:

  1. Vim to Emacs
  2. Vim to Emacs - Ace Jump Mode
  3. Vim to Emacs - YASnippets
  4. Vim to Emacs - Smart Tab

Another plugin I miss from Vim is snipMate, I use this plugin to insert snippets of code while programming. Once again Emacs has me covered, YASnippet offers the same functionality.

Setup

Create a yasnippet.el in the .emacs.d/personal folder.

personal/yasnippet.el

1
2
3
4
(prelude-require-package 'yasnippet)

(require 'yasnippet)
(yas-global-mode 1)

Here I make sure the yasnippet package is available then require the package and enable it globally.

Personal Snippets

You can create your own personal snippets in the .emas.d/snippets folder. More details in this slightly outdated guide.

Ruby Snippets

I have also installed a set of ruby and rspecs snippets from bmaland’s repo. I simply cloned the repo into the personal snippest folder with name ruby-mode. Note the name is important it needs to match the Emacs mode where the snippets are used.

1
git clone git@github.com:bmaland/yasnippet-ruby-mode.git ~/.emacs.d/personal/ruby-mode

Vim to Emacs - Ace Jump Mode

This post is part of a series:

  1. Vim to Emacs
  2. Vim to Emacs - Ace Jump Mode
  3. Vim to Emacs - YASnippets
  4. Vim to Emacs - Smart Tab

One of the things I miss from Vim is the wonderful Easy Motion which allows you to jump quickly to any word in the buffer.

Thankfully Emacs has a very similar package Ace Jump Mode.

Setup

Using Prelude setup was simple, create a file in the personal folder and it will be auto loaded when Emacs starts.

personal/ace-jump-mode.el

1
2
3
4
(prelude-require-package 'ace-jump-mode)

(require 'ace-jump-mode)
(define-key global-map (kbd "C-c SPC") 'ace-jump-mode)

I’m using the prelude-require-package function to make sure the ace-jump-mode package is available just in case this is a new machine where the package has not been installed.

I then require the ace-jump-mode package and bind a short cut key to C-c SPC.

Now when I press Ctrl + c followed by Space Emacs asks for a Head Char: which will then highlight all words that begin with that Char. Pressing that char jumps straight to that Char.

A screen cast is worth a thousand words:

Vim to Emacs

This post is part of a series:

  1. Vim to Emacs
  2. Vim to Emacs - Ace Jump Mode
  3. Vim to Emacs - YASnippets
  4. Vim to Emacs - Smart Tab

Why?

Mostly curiosity. As a long time Vim user I’ve heard lots of good and bad about this other ancient editor Emacs. As well as my curiosity I’ve rubbed up against a few rough edges lately mixing Vim and Tmux’s modal modes and problems getting Vim plugin’s working cross platform.

I decided to find out for myself, is Emacs is as good/bad as they say?

Evil

I’ve tried Emacs before but quickly returned to Vim after becoming perplexed at the number of Ctrl + x Ctrl + ?!? keystrokes needed to do the simplest of actions. This time I’m trying the Evil package with gives Vim like editing within Emacs. The best of both worlds? Or too good to be true?

So far I’m very impressed with Evil, once this package was installed I was right at home. You really can’t get way without learning some of the basic Emacs control keys but they are very small in number.

Emacs Redux

Out of the box Emacs is not the most pleasant of experiences, just like Vim it is very raw until you tweak the config. Thankfully Emacs is ridiculously configurable you really can create an editor suited to your own personal tastes. Configuration is done via Emacs Lisp, a little overwhelming for beginners but I do look forward to learning the language. It’s certainly looks a lot nicer than VIML!

I quickly realised hacking on my init.el conifg file with my limited knowledge was not the way to go. I eventually found the excellent Emacs Redux blog and the Prelude configuration project. This project has allowed me to have a solid foundation as I find my feet in Emacs land.

Initial Config

I’ve also changed a few Prelude defaults which can be found in my personal fork.

Conclusion

So far so good. I’m honestly surprised how quickly I’ve settled in with Emacs this time, there is lots here to like. I really don’t feel like I’m deserting Vim, thanks to Evil all that Vim ‘muscle memory’ is coming along with me.

Git feature workflow - more basic commands

Switch on vim colour

Do your self a favour and switch on git colour it makes the command line output much easier to read.

git config --global --add color.ui true

Remote branches

Working as part of a team at some point you’ll need to take a look at a team mates branch, first they need to push their branch up to github.

git push origin -u my-awesome-new-feature

Pull down a team mates branch

Don’t know or can’t remember the remote branch name?

git branch -r

Next you need to create a local branch that tracks the remote branch.

git checkout --track origin/my-awesome-new-feature

This command creates a local branch named my-awesome-new-feature which is tracking the remote branch. Now when you push your changes the remote branch will be updated.

Fix a conflict

When you have a conflict in a feature branch you’ll not be able to auto merge on github you’ll need to merge the branch manually.

1
2
git checkout master
git merge my-awesome-new-feature

Fix any conflicts.

fugitive.vim: a Git wrapper so awesome, it should be illegal

Finally git push the merge up to github and you’re done.

Git feature workflow - basic commands

List of basic commands to use during feature branch workflow.

Create feature branch

1
git checkout -b my-awesome-new-feature

NOTE: The -b parameter means branch, it saves us having to use two separate git commands. Without this option we’d need to branch then checkout.

Now do lots of work on the new feature…

Find out what has changed

When finished working on the new feature find out what has changed.

1
git status

Add changes to git

Either add each file manually using:

1
git add my-changed-file.txt

Or add all the files in the current directory.

1
git add .

Run git status one more time to get a list of everything that is going to be committed.

NOTE: Accidentally added files can be removed using the command git rm <filename>

Commit changes

Commit your changes with a meaningful message.

1
git commit -m "my awesome new feature, this changes everything!"

Push changes

Push the new feature up to github so we can do a pull request.

1
git push origin -u my-awesome-new-feature

The new branch should now be visible on github and we can now issue a pull request.

Jenkins for .net in 5 Minutes

This post is part of a series:

  1. Jenkins.NET
  2. Jenkins.NET Plugins
  3. Setup Jenkins.NET
  4. Setting up your first job
  5. Your first build
  6. Breaking the build
  7. Diagnosing and fixing a broken build
  8. Monitoring your build
  9. Running your tests
  10. Code Analysis
  11. Security
  12. Active Directory Security

For my final post on using Jenkins with .net, here’s how to set it all up in 5 minutes!

Install

  1. Download the latest version of Jenkins from: http://mirrors.jenkins-ci.org/windows/latest
  2. Extract the setup files from the zip file.
  3. Run the Setup.exe.
  4. Accept all the defaults in the setup wizard.
  5. Jenkins will now be installed and the main Jenkins page will be open.

Add required .NET Plugins

  1. Download and install your required .NET framework from: http://www.microsoft.com/net/download
  2. Open the Manage Plugins page, from the Jenkins menu select Jenkins » Manage Jenkins » Manage Plugins.
  3. Click the “Available” tab.
  4. Tick the “MSBuild” plugin.

Add optional .NET Plugins

  1. Tick the plugin for the source control management software your using.
  2. If you want to run unit tests as part of your build Tick your chosen testing plugin, this guide will use NUnit.
  3. Tick the “Active Directory Plugin” if you want to use Active Directory for Authentication.

Setup Jenkins

  1. Open the main setup page, from the Jenkins menu select Jenkins » Manage Jenkins » Configure System.
  2. Under the MSBuild section, click the “Add MSBuild” button.
  3. Set the name and path to MSBuild for example: Name: v3.5 Path to MSBuild: C:\Windows\Microsoft.NET\Framework\v3.5\MSBuild.exe
  4. Click the “Save” button.

Setting up your first job

  1. From the Jenkins menu click Jenkins » New Job.
  2. Set Job name for example: Demo.
  3. Select the “Build a free-style software project” radio button.
  4. Then click the “OK” button.
  5. Jenkins will now create the Job workspace on disk and redirect you to the job configuration page.

Source Control

This guide will use Subversion but there are many available.

  1. Under the Source Control Management section select the “Subversion” radio button.
  2. Set the Repository URL for example: https://jenkins-net-demo.googlecode.com/svn/trunk

Build Triggers

  1. Under the Build Triggers section, tick the Poll SCM checkbox.
  2. Enter “5 * * * *” in the Schedule text area, this translates to check for changes every 5 minutes.

Build the Solution

  1. Under the Build section click the “Add build step” button and select “Build a Visual Studio project or solution using MSBuild”.
  2. Set “MsBuild Version” to V3.5 (The version we setup previously)
  3. Set “MsBuild Build File” to the name of the demo solution: Jenkins-net-demo.sln
  4. Click the “Save” button and you’ll be redirected to the Demo project page
  5. Click the “Build Now” link.

You’re done!

Active directory security

This post is part of a series:

  1. Jenkins.NET
  2. Jenkins.NET Plugins
  3. Setup Jenkins.NET
  4. Setting up your first job
  5. Your first build
  6. Breaking the build
  7. Diagnosing and fixing a broken build
  8. Monitoring your build
  9. Running your tests
  10. Code Analysis
  11. Security
  12. Active Directory Security

If you happen to be running Active Directory within your organization you can have Jenkins utilize it for authentication. This will save you and your team from having to remember yet another password when connecting to Jenkins.

Install the Active Directory Plugin via Jenkins » Manage Jenkins » Manage Plugins

Configuration

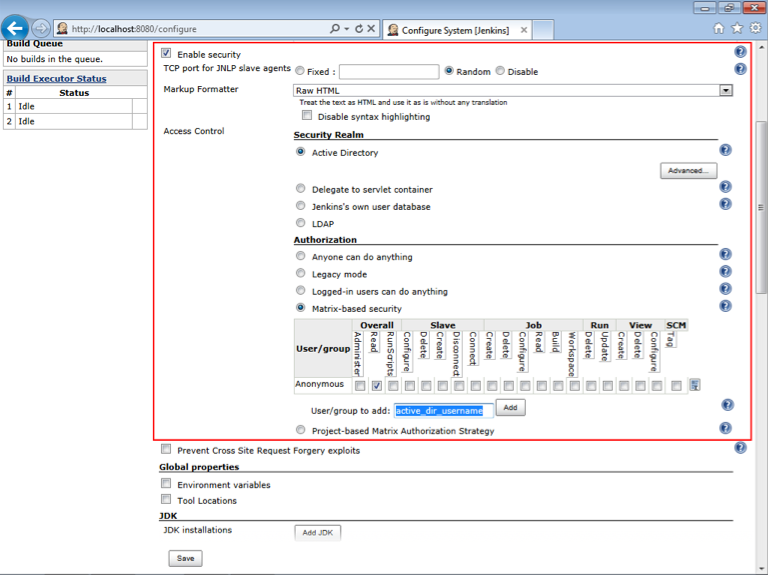
active directory 1

Tick the “Enable security” check box to open up the security area.

Access Control

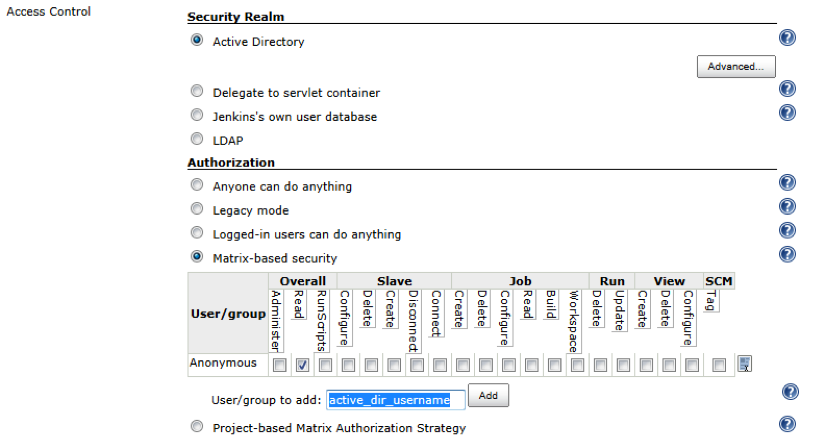
active directory 2

Under the Access Control - Security Realm section select the “Active Directory” radio button.

Authorization

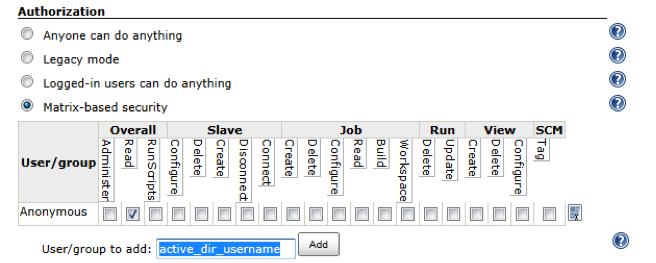
active directory 3

Under the Authorization section select the “Matrix-based security” radio button.

This option will give you the most flexibility over the security for Jenkins. I usually give Anonymous users Read access that allows me to share the build information with managers and stake holders if they are interested. As I trust my fellow developers I will usually give them Administrator access on the server. Of course you are free to setup whatever security Matrix you like, you can even take this as far as a project-based matrix.

  • Enter your Active Directory username in the “User/group to add” text box.

NOTE: Usernames are case sensitive! Kindly pointed out by bartensud, read his comments below for more details.

  • Click the “Add” button.
  • Tick the Administer check box in the Overall area of the matrix.
  • Finally click the “Save” button.

You have just given administrator access to this user, and they will be able to login to Jenkins using their Active Directory password.

Trouble shooting

If you find Jenkins is not connecting to your Active Directory controller, try setting the advanced settings for the Active Directory plugin.

active directory 4

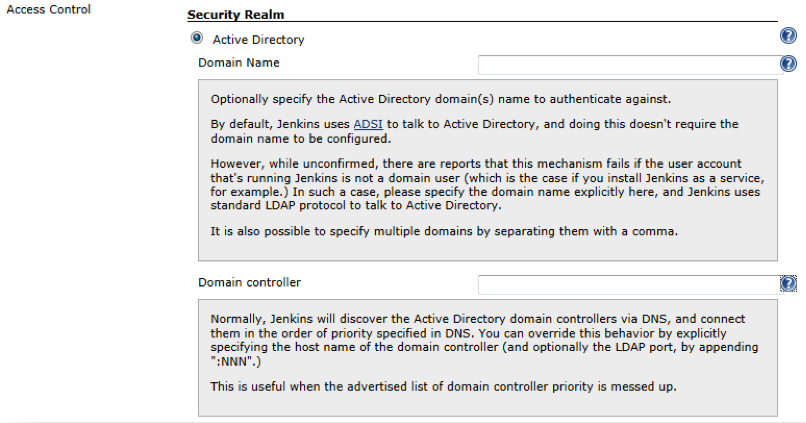
Click the “Advanced…” button. To reveal the area where you can specify the full details of your Active Directory Domain and Server.

active directory 5

Start by setting the Domain Name of your Active Directory and clicking the “Save” button. Now retry your Active Directory access.

This worked first time for me but if your not so lucky, try the same process again with the Active Directory Domain controller setting.

Security

This post is part of a series:

  1. Jenkins.NET
  2. Jenkins.NET Plugins
  3. Setup Jenkins.NET
  4. Setting up your first job
  5. Your first build
  6. Breaking the build
  7. Diagnosing and fixing a broken build
  8. Monitoring your build
  9. Running your tests
  10. Code Analysis
  11. Security
  12. Active Directory Security

By default Jenkins is wide open to anyone who stumbles across your web server, depending on your circumstances you may want to enable Jenkins security and force developers and even guests to login.

Configuration

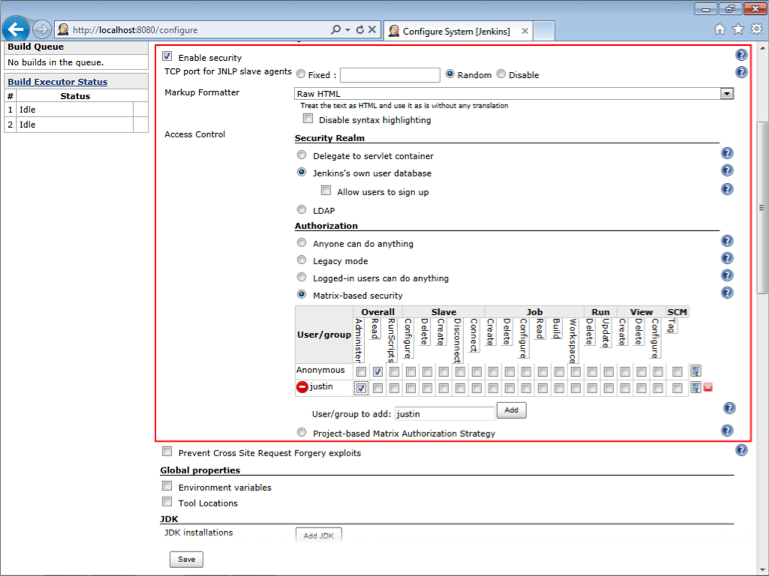
Jenkins security is configured from the main Jenkins configuration page which is accessed via Jenkins » Manage Jenkins » Configure System.
security 1

Tick the “Enable security” check box to open up the security area.

Access Control

security 2

Under the Access Control - Security Realm section select the “Jenkins’s own user database” radio button.

Un-tick the “Allow users to sign up” check box otherwise anyone hitting the site will be able to sign up for an account (if your enabling security my guess is you don’t want that).

Authorization
security 3

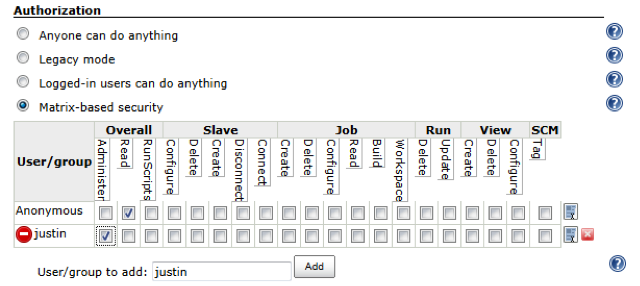
Under the Authorization section select the “Matrix-based security” radio button. This option will give you the most flexibility over the security for Jenkins. I usually give Anonymous users Read access that allows me to share the build information with managers and stake holders if they are interested. As I trust my fellow developers I will usually give them Administrator access on the server. Of course you are free to setup whatever security Matrix you like, you can even take this as far as a project-based matrix.

Add Administrator

  • Enter your username in the “User/group to add” text box.
  • Click the “Add” button.
  • Tick the Administer check box in the Overall area of the matrix.
  • Finally click the “Save” button.

First user sign up

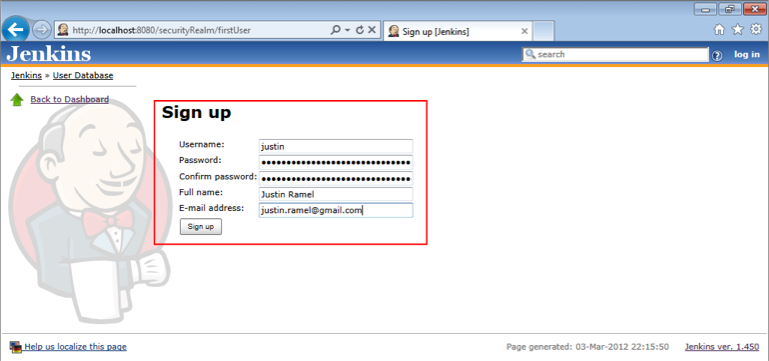
If this is the first time you’ve setup a user on the server Jenkins will immediately ask for your user credentials.
security 4

  • Enter your user credentials.
  • Click the “Sign up” button.

You should see a success message from Jenkins saying you are now logged in.

Adding Users

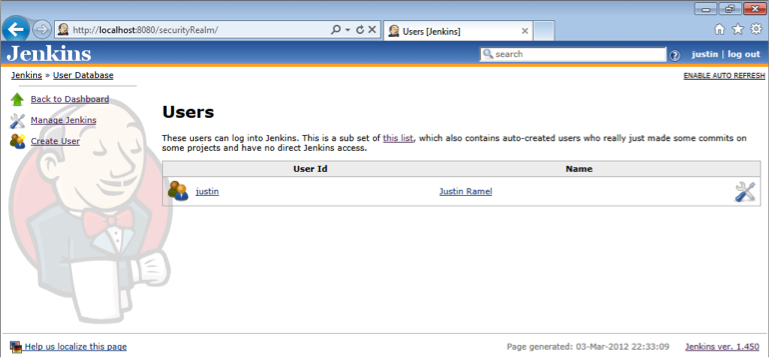
You’ll want to add more users to the servers this is done via the Manage Users page. You can access this page via Jenkins » Manage Jenkins » Manage Users.
security 5

Create User

Click the Create User link to add another user.

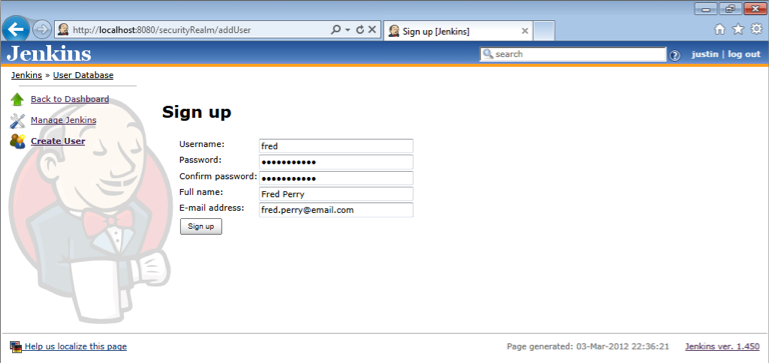
You will now see the Sign up page.
security 6

Enter the credentials for the new user. Make sure you remember the username, as you’ll probably want to give the new user more than read only access to the server.

Authorization

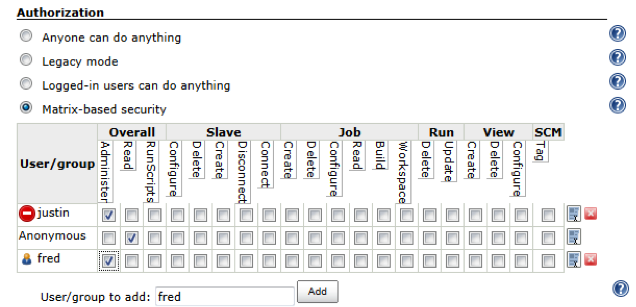
After creating the user you’ll want to give them an authorization level. This is done via the main Jenkins configuration page, Jenkins » Manage Jenkins.
security 7

  • Enter your username in the “User/group to add” text box.
  • Click the “Add” button.
  • Tick the Administer check box in the Overall area of the matrix.
  • Finally click the “Save” button.